 Extend Path Preferences
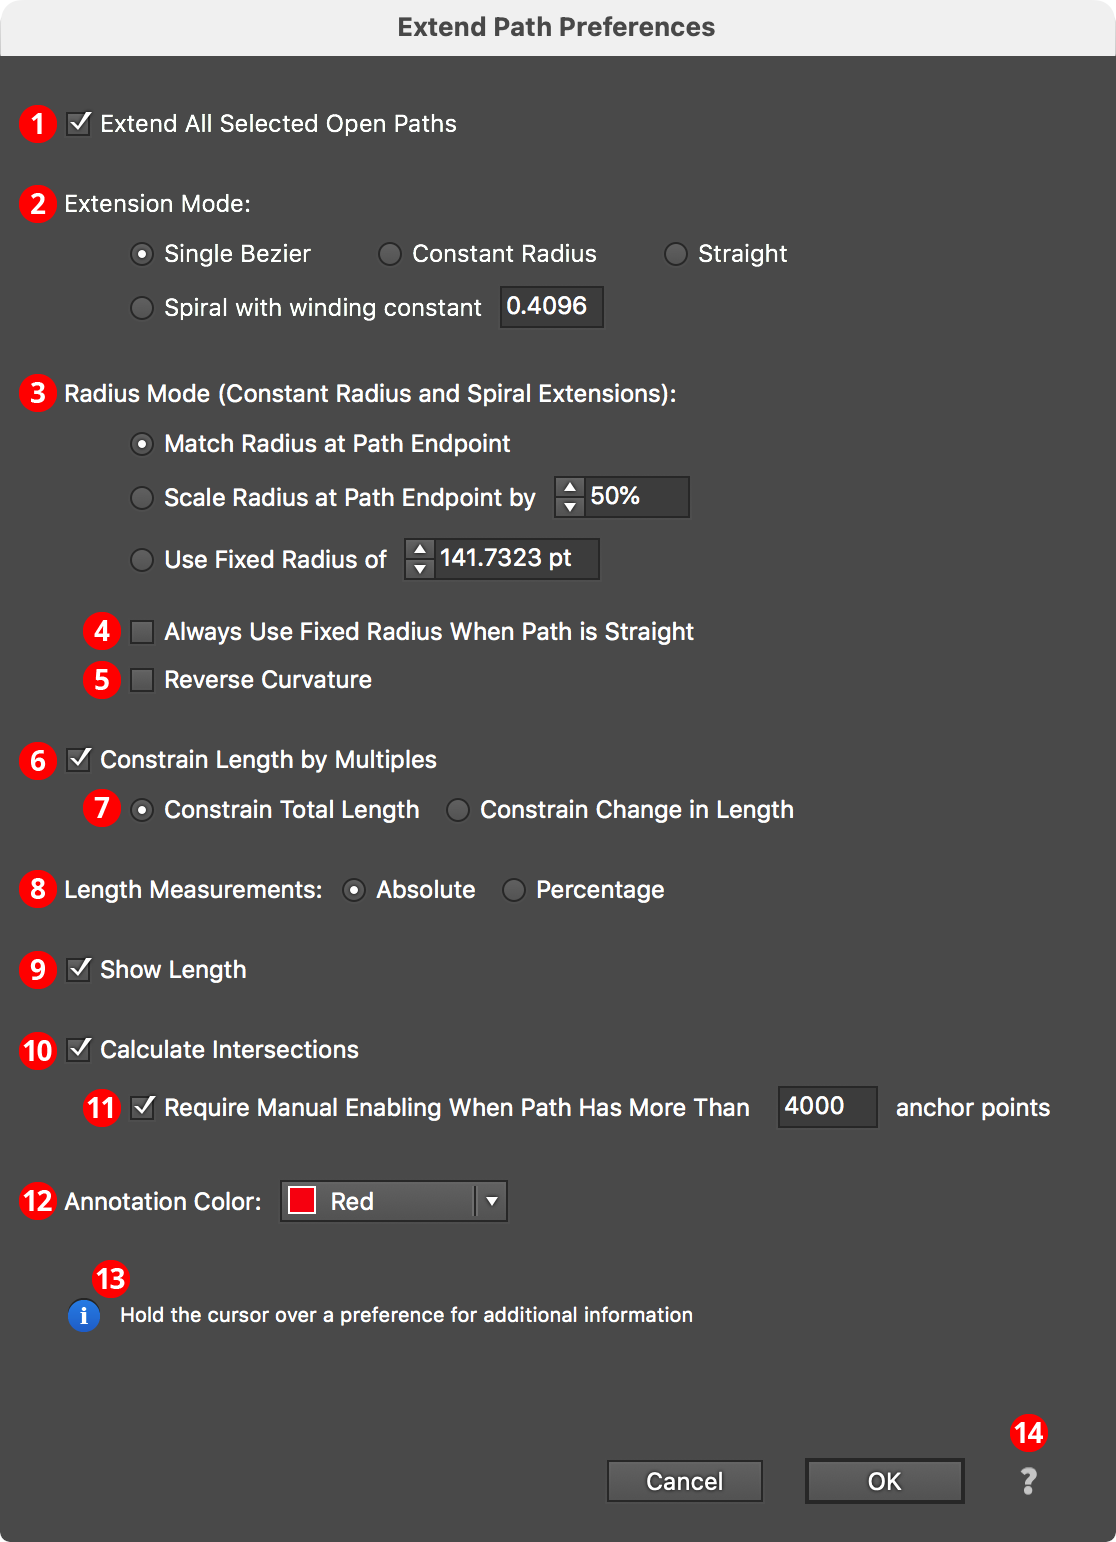
The Extend Path Tool preferences dialog can be brought up in two ways: by double-clicking on the Extend Path tool icon in the toolbar; or by pressing the Return/Enter key when the Extend Path tool is selected.
Extend Path Preferences
1. Extend All Selected Open Paths
Allows the Extend Path tool to work on multiple paths rather than just a single path. This preference can be toggled on the fly by pressing the A key. When multiple paths are being extended, the Extend Path tool cursor will change to reflect this.
2. Extension Mode
Specifies the mode to use when extending a path (see Extend Path Tool: Extension Modes). When the mode is “Spiral,” also allows specification of the winding constant (0.001 to 0.99). The mode can be changed on the fly by pressing the E key, and the spiral winding constant can be changed on the fly with the Up Arrow and Down Arrow keys.
3. Radius Mode
Specifies the radius of the extension when using Constant Radius or Spiral extensions (see Extend Path Tool: Extension Modes). The radius mode can be changed on the fly by pressing the R key. The scale value or fixed radius value can be changed on the fly with the Left Arrow and Right Arrow keys.
4. Always Use Fixed Radius When Path Is Straight
When enabled, straight paths will always be extended using Fixed mode, even if the mode is actually set to Matched or Scaled. This is because the radius of a straight path is infinite, so Matched and Scaled radii would always just produce a straight extension.
5. Reverse Curvature
When enabled, the direction of curvature of the extension will be opposite that of the existing path (see Extend Path Tool: Keypresses). The preference can be toggled on the fly by pressing the V key.
6. Constrain Length by Multiples
See Extend Path Tool: Constraining below. The mode can be toggled on the fly by pressing the C key; also, constraining can be overridden by holding down Command/Ctrl.
7. Constrain Mode
Applicable when using Absolute measurements with Constrain Length by Multiples, specifies whether it is the total length of the path which is being constrained to multiples of the keyboard increment value, or the change in the path’s length.
8. Length Measurement Type
When set to Absolute, the length of the path is measured and displayed in the current units, and the Constrain Mode is relevant. When set to Percentage, the length of the path is measured and displayed as a percentage of its original length.
9. Show Length
Displays length measurements next to the cursor. The preference can be toggled on the fly by pressing the L key.
10. Calculate Intersections
11. Require Manual Enabling...
When enabled, intersections of the path extensions to other paths, the extensions themselves, and the original path are pre-calculated and the cursor will snap to these positions (indicated by a circle being drawn around the dragged limit line). When there are many unlocked paths in the document that could be potentially intersected, this may cause a delay after pressing the mouse button down. For this reason, unless intersection snapping is specifically needed, it may be advantageous to turn off the preference, as it can always be re-enabled on the fly by pressing the I key. When working with complex paths, the subpreference may also be useful. It allows setting a threshold value for the anchor point count above which intersections are never automatically calculated (even if the Calculate Intersections preference is enabled) until the I key is pressed.
12. Annotation Color
The color with which certain annotations are displayed. The default value is red; it can be changed on the fly with the H key.
13. Informational area
Shows a brief description of each preference setting when the cursor is being held over it.
14. Help Button
Opens the help documentation in the Astute Manager. If this does not automatically appear, please ensure your Astute Manager is running first.