
 Gap Tool
Gap is an Astute Graphics tool for Adobe Illustrator that functions like the Gap tool in InDesign, adjusting the horizontal or vertical spacing between adjacent objects or between objects and the edges of the artboard (gaps, also referred to as gutters) without having to manually resize each individual piece of art. It can also move the objects on either side of the gap rather than scaling them. The Gap tool goes beyond the InDesign implementation and allows gaps to be snapped to existing objects, have their widths constrained to “nice” values, or set numerically. Preferences are available to specify how to scale text frames and clip groups. Gap is part of the ColliderScribe plugin.
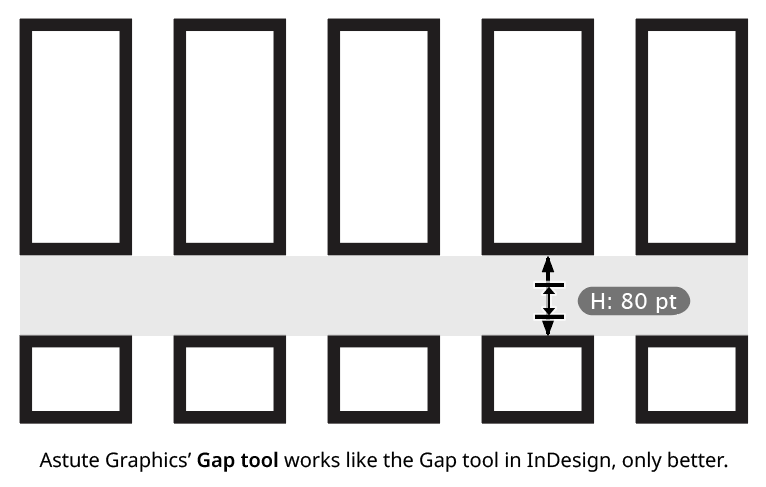
Gap Tool Example
Tool Location and Cursor Appearance
The Gap tool appears in Illustrator’s main toolbar (which must be in Advanced mode: View > Toolbars > Advanced) stacked under the native Selection tool along with ColliderScribe’s other tools. As with other stacked tools, click and hold on the top tool icon to display the tools stacked under it.
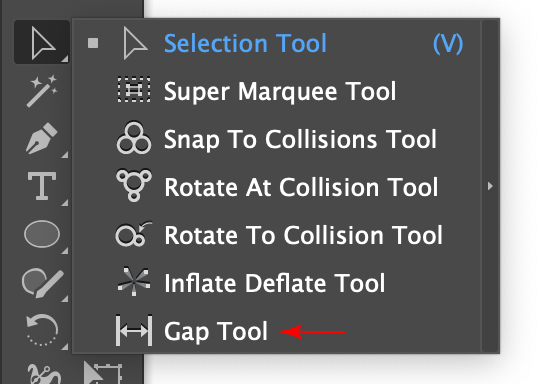
Gap Tool Location
The Gap tool’s cursor (when hovering over or dragging a gap) is a representation of a vertical or horizontal gap with an arrow indicating its width. Otherwise, it shows a “ban” symbol, which may be accompanied by explanatory text if the cursor is not over the active artboard.

Gap Tool Cursors
Gap Tool Operations
As the Gap tool has several keypresses which can add or change its functionality, we strongly suggest installing the free Astute Graphics plugin Astute Buddy, which creates a panel that dynamically updates to inform you of the various keys which can be pressed in the tool’s current context.
The Gap tool only works on unlocked art objects which are on the active artboard. Groups are always treated as a single object (unless isolated). Object selection status is ignored. When the cursor is placed between two objects (or between an object and an edge of the artboard, when enabled), the cursor changes, and the gap, or gutter, between them is indicated with a light gray rectangle. Although the tool is typically used on rectangular objects, it will work with any object: the object’s axis-aligned bounding box defines its “edges”.
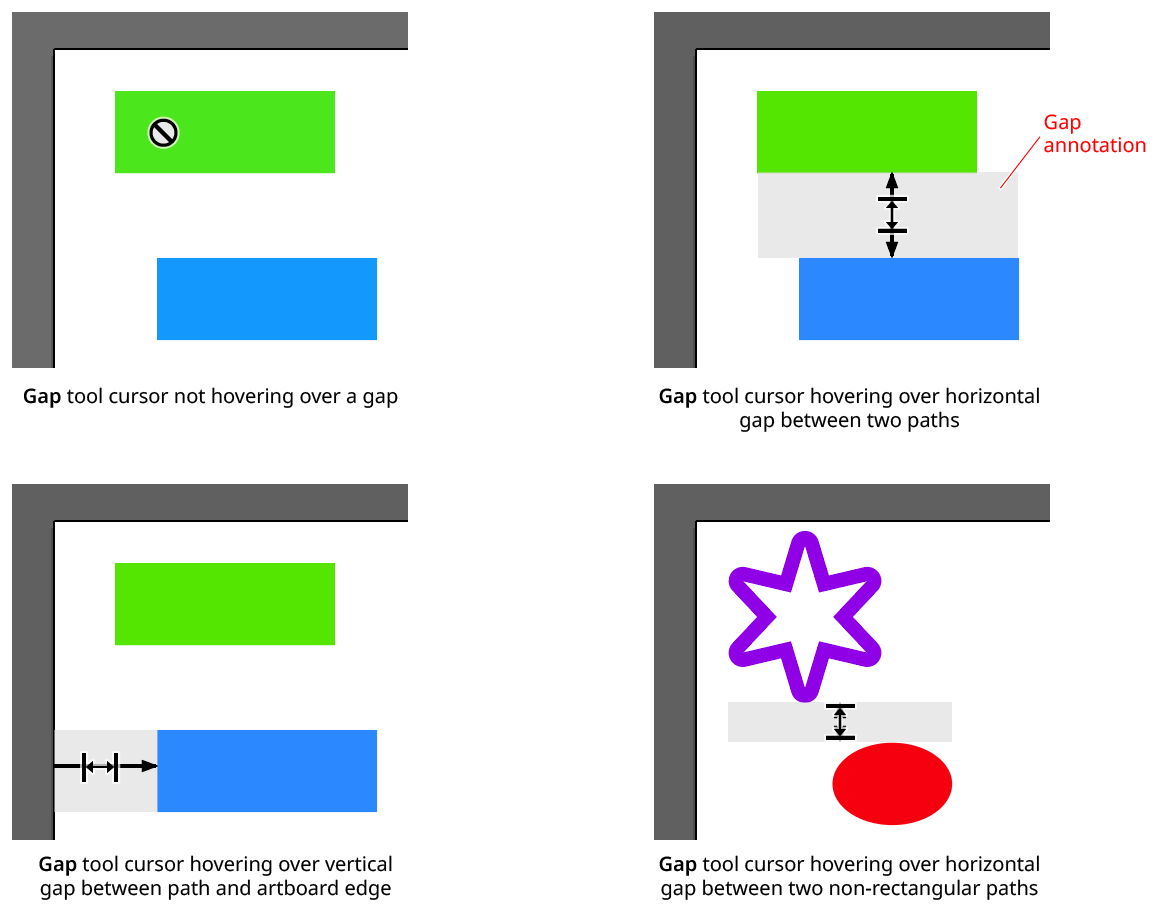
Gap Cursor Hovering State
If valid gaps exist in both the horizontal and vertical directions, the tool operates on the shorter gap.
As with the InDesign tool, gaps are extended to adjacent objects so long as the gaps all have the same top/bottom or left/right edges, and as long as there is no intervening art. But unlike the InDesign tool, the Astute Graphics Gap tool allows for a user-defined tolerance, so gaps which are not perfectly aligned can still be moved or resized, and can even auto-align the art to the gap (see Gap Preferences).
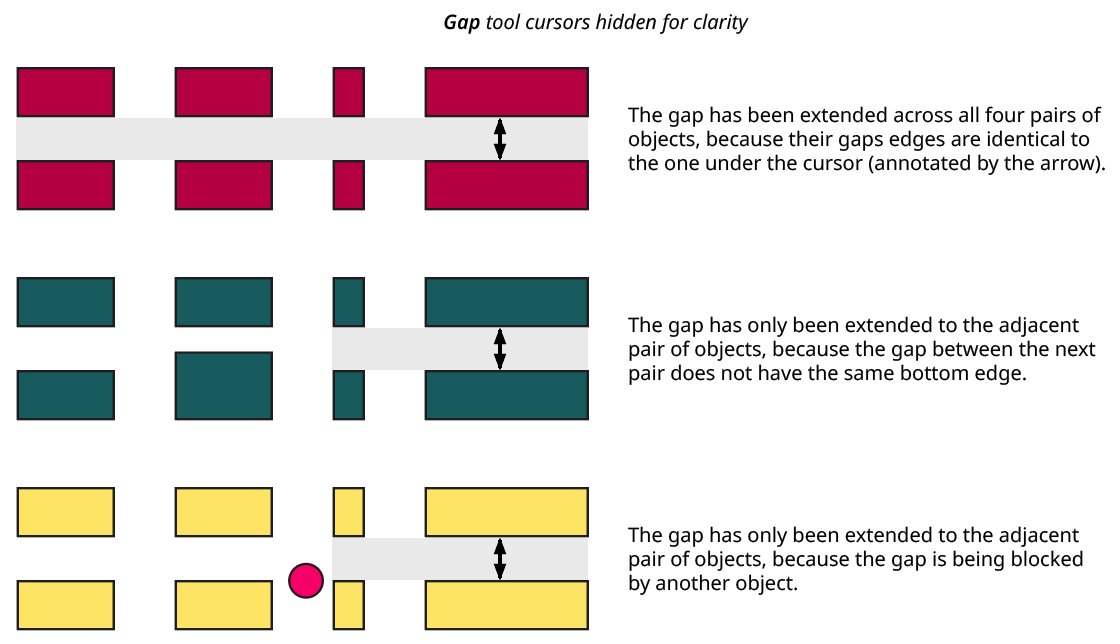
Gap Extension
To keep the gap from being extended — in other words, to only affect the object(s) on either side of the cursor — hold down the Shift key.
Once the mouse button has been pressed down, the width/height of the gap will be annotated next to the cursor in the current document units (this annotation may also be set to appear all the time). Dragging art-to-art gaps will move the gap while non-proportionally scaling the objects on either side of it, as needed.
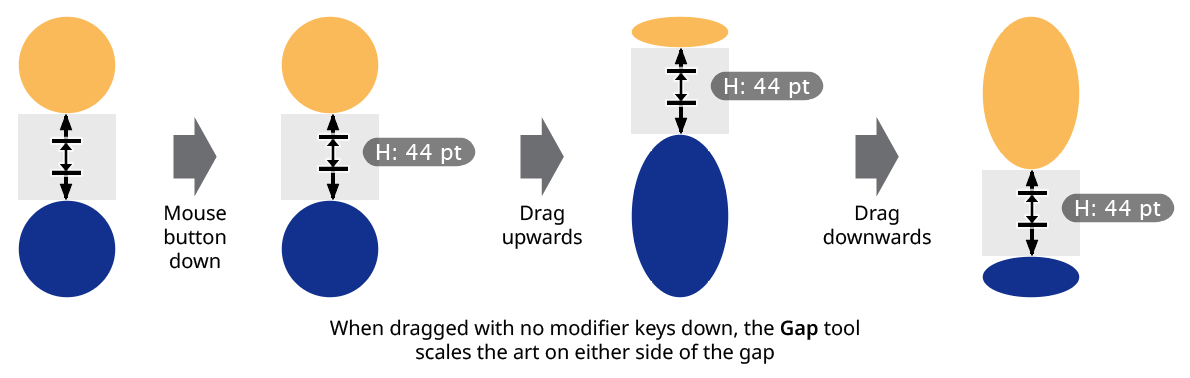
Gap Basic Dragging (Art to Art)
The gap is blocked by being dragged past any point at which an art object becomes scaled to 0% in either the horizontal or vertical direction. However, if a “blocking” art object had started out as if it had been scaled to 0% in the drag direction (such as a ruler guide), it will be moved rather than blocking the drag.
For art-to-artboard gaps, the gap is not moved but is instead resized (since the edge along the artboard must stay fixed at the edge of the artboard), but the art scaling is done in the same way.
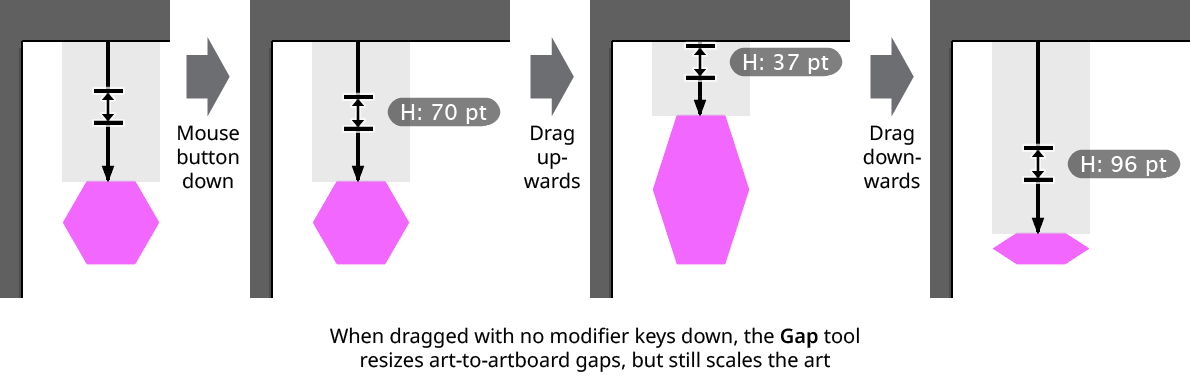
Gap Basic Dragging (Art to Artboard)
Art-to-artboard gaps may be dragged off the artboard to create bleed:
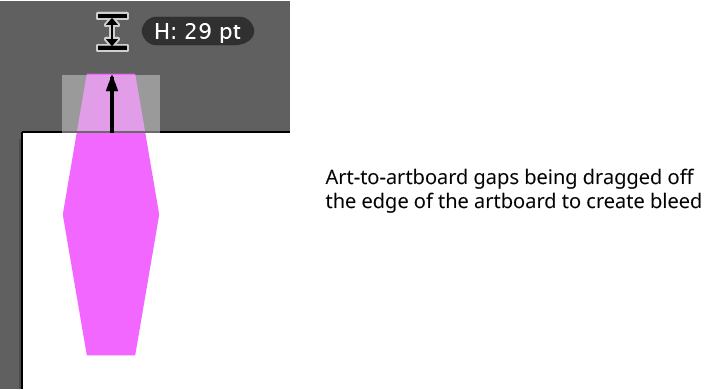
Gap Dragging (Art to Artboard) to Make a Bleed
As with the InDesign tool, if Option/Alt is held down, then the art objects are not scaled, but are instead simply moved. In this case, therefore, the gap may be dragged any distance in either direction.
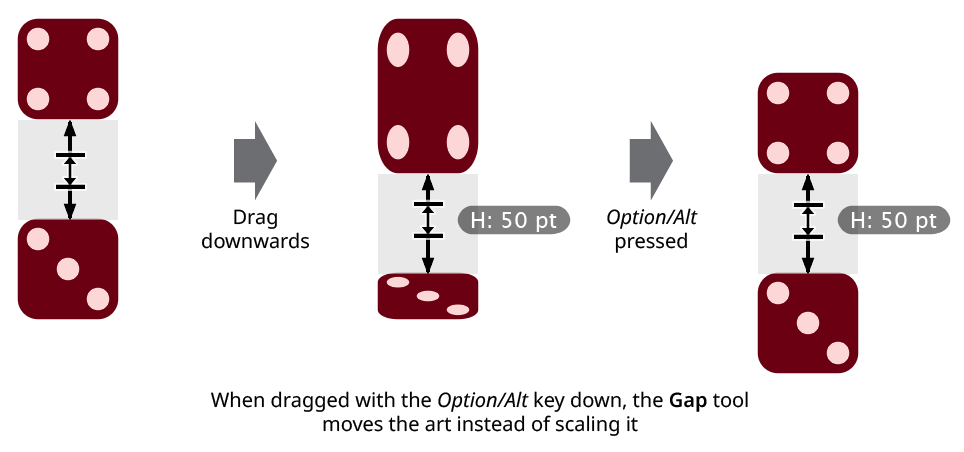
Gap Dragging with Option
When dragging an art-to-art gap, Command/Ctrl may be pressed to resize the gap (from its center) rather than shifting it. Art objects are either scaled or moved, depending on the state of the Option/Alt key, which acts independently.
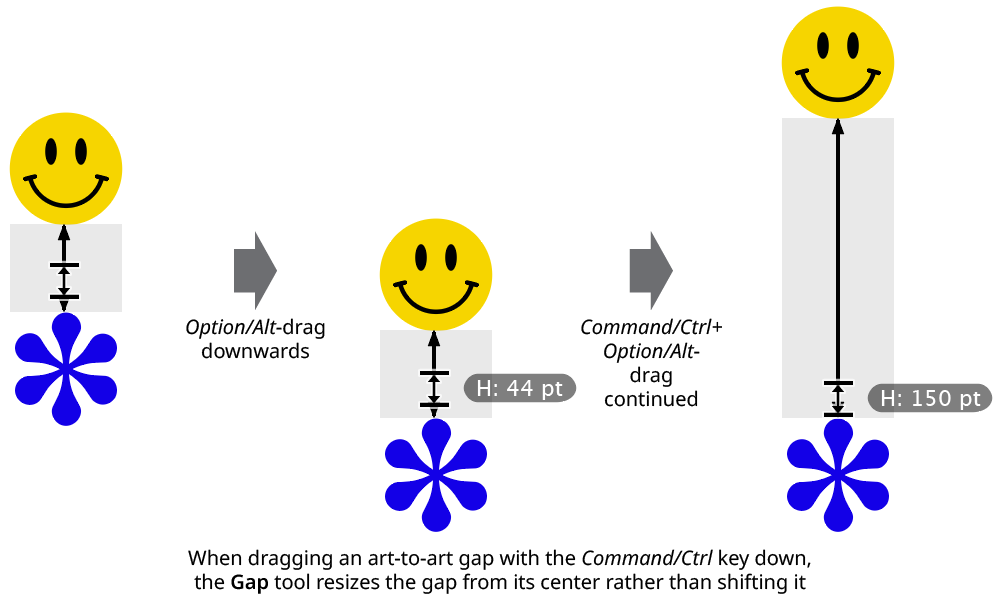
Gap Dragging with Command
Note that while both Shift and Option/Alt may be pressed prior to the tool being dragged, in Illustrator the Command/Ctrl key temporarily switches the current tool to a selection tool unless the mouse button is down, so the key can only be pressed after the drag has begun.
To numerically specify the size of a gap, press Shift and/or Option/Alt as required and then doubleclick the gap. A small dialog will be brought up, allowing you to enter the width of the gap directly. The artwork will update itself whenever the width value is changed, allowing you to preview the change before committing it with the OK button.
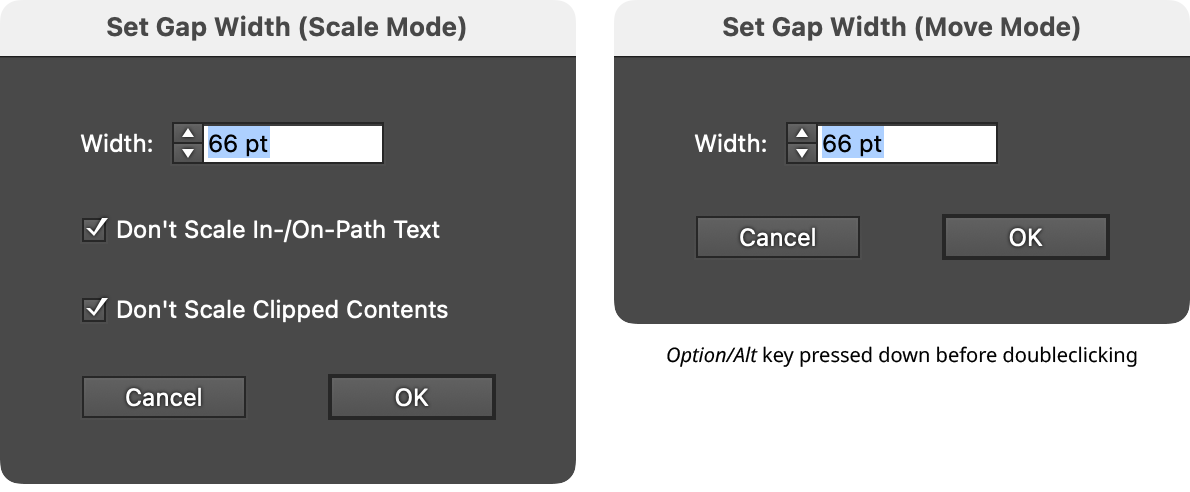
Gap Width Setting Numerically
As with dragging a gap, if Option/Alt was not being held down before doubleclicking and the gap width is limited to a certain range due to scaling factors reaching 0%, then the numerical value that may be entered will have the same limits. Also, when Option/Alt was not being held down and therefore artwork is being scaled rather than moved, then the dialog will contain checkboxes allowing the corresponding preferences to be overridden for that specific operation (see Gap Preferences). For art-to-artboard gaps, negative values may be entered for the gap width to specify that the gap extends off the artboard.
Gap Preferences
Doubleclicking the Gap tool in the toolbox (or pressing the Enter key when the tool is selected) will bring up its preferences dialog.
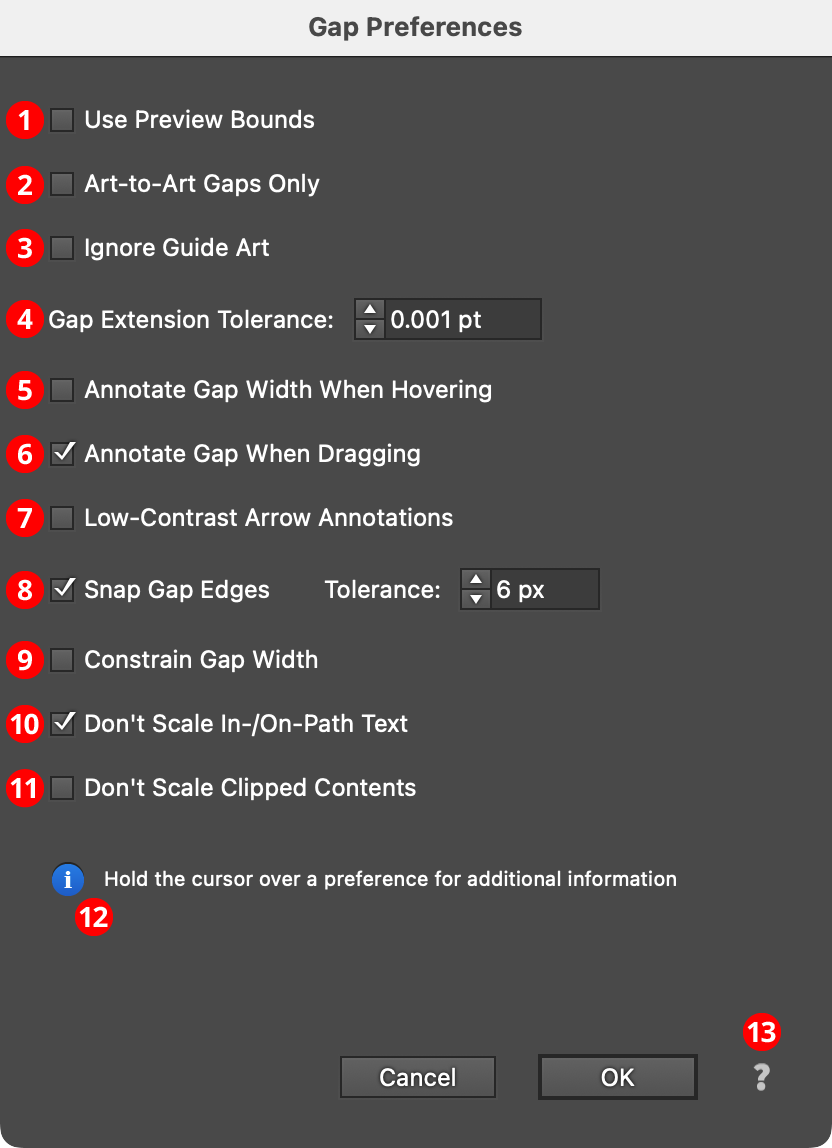
Gap Preferences Dialog
1. Use Preview Bounds
Overrides the general preference of the same name. When enabled, the strokes and live effects of the artwork are included when calculating its bounding box, which affects where the gaps are positioned.
2. Art-to-Art Gaps Only
When enabled, the Gap tool will ignore all gaps between art and the edges of the artboard.
3. Ignore Guide Art
When enabled, the Gap tool will ignore all guide art (both ruler guides and art turned into guides), even when unlocked.
4. Gap Extension Tolerance
Specifies how close the edges of adjacent art objects must be to the gap edges to be considered part of an extended gap comprised of multiple pairs of objects (or the artboard edge and multiple objects). The default value is 0.001 pt, but it can be increased to as high as 12 pt. When an extended gap includes objects which are within tolerance but are misaligned by more than 0.001 pt, the gap will be drawn in pink instead of gray.
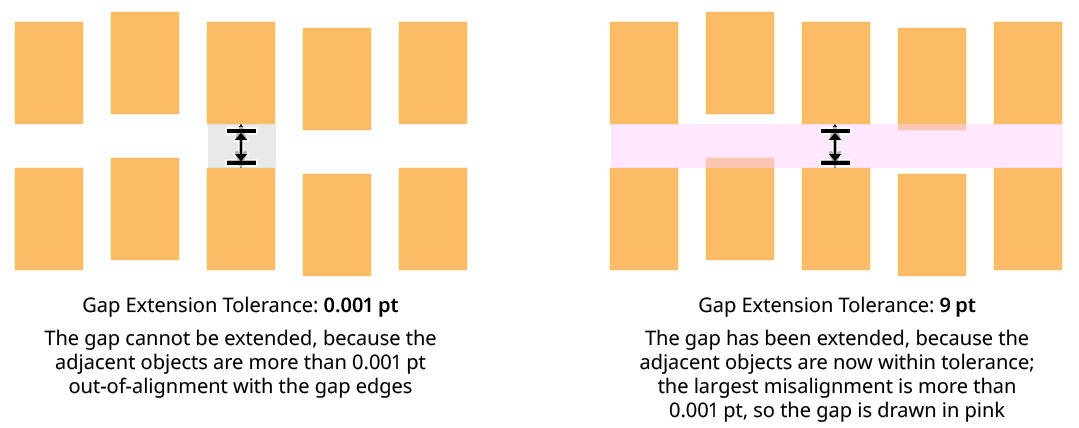
Gap Extension Tolerance
When dragging an extended gap with misaligned objects, the F key may be pressed to force alignment of all the objects. Pressing F a second time will restore the misalignment.
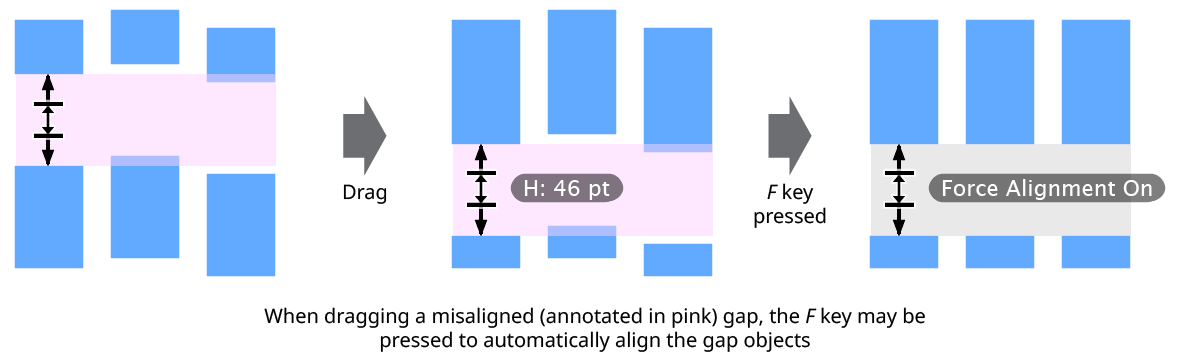
Gap Aligning Objects
5. Annotate Gap Width When Hovering
When enabled, the size of the gap is shown when hovering over a gap with the cursor (and not just when dragging the gap). The preference is off by default (to resemble the InDesign tool).
6. Annotate Gap When Dragging
If Annotate Gap When Dragging is turned off, the gray rectangle and black arrow annotations will not be drawn when the tool is being dragged. The preference may be toggled on the fly by pressing the A key.
7. Low-Contrast Arrow Annotations
When enabled, the arrows that are drawn over the annotated gap rectangles are rendered with lower opacity. The preference is off by default (to resemble the InDesign tool).

Gap Arrow Annotations
8. Snap Gap Edges
By default, when dragging a gap to move or resize it, its edges are snapped to the edges of the bounding boxes of other objects on the same artboard, with a default snapping tolerance of 6 screen pixels. When a gap edge is being snapped, a red guide is drawn at the snapped location. Snapping may be turned on or off while dragging a gap by pressing the S key.
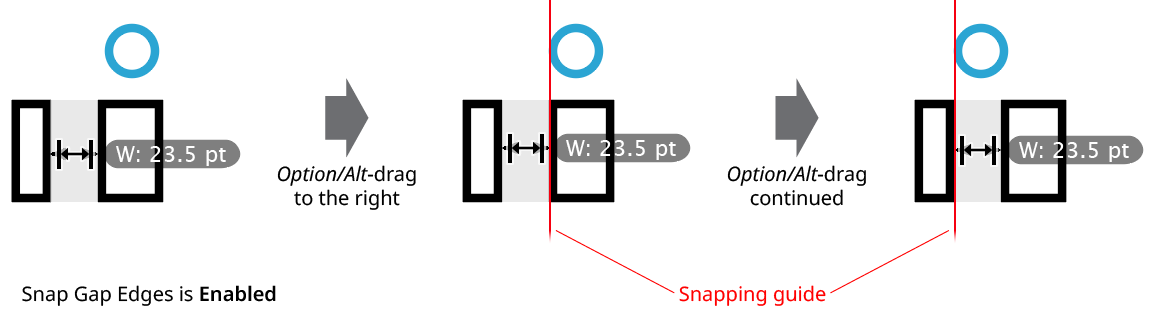
Gap Snapping
9. Constrain Gap Width
If enabled, then when resizing a gap by dragging it, its width will be constrained to integer multiples of the native keyboard increment value. For example, if the keyboard increment is set to 20 pt, then the gap width could only be resized to 0 pt, 20 pt, 40 pt, 60 pt, and so on. This constraint takes precedence over snapping. Constraining does not affect gap location when moving a gap without resizing it. Constraining may be turned on or off while dragging a gap by pressing the C key.
10. Don’t Scale In-/On-Path Text
By default, the Gap tool acts like InDesign’s Gap tool and scales the paths of In-Path and On-Path text objects, but not the text itself. However, by turning off this preference, it can be made to scale the text as well (treating these objects as if they were point text). The preference can be turned on or off while dragging a gap by pressing the T key.
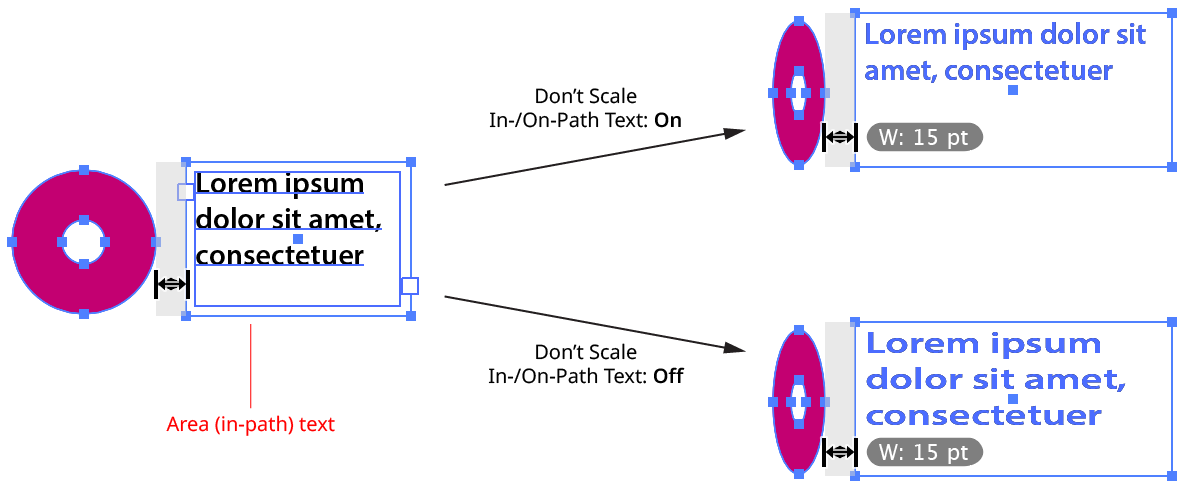
Gap Scaling Text
11. Don’t Scale Clipped Contents
By default, the Gap tool treats a clip group like any other group and scales it as a whole. However, by turning Don’t Scale Clipped Contents on, only the clipping path of a clip group is scaled, not its contents. This might be useful, for example, when adjusting gaps between clipped images. Note that clipped content may need to be adjusted afterwards, depending on the scale factor. The preference can be turned on or off while dragging a gap by pressing the M key.
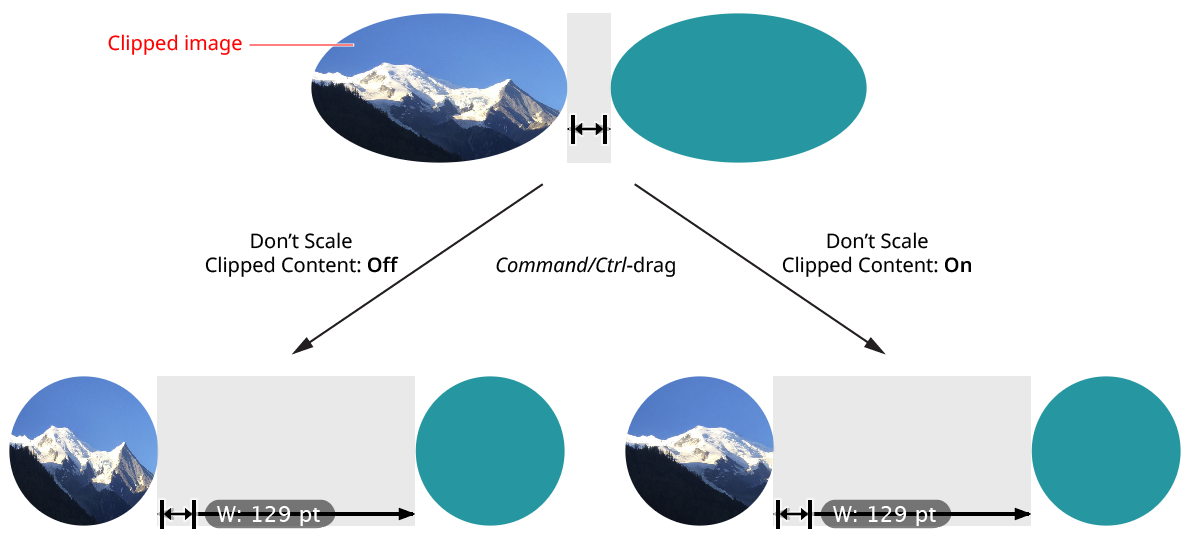
Gap Scaling Clipped Content
10. Informational area
Shows a brief description of each preference control when the cursor is being hovered over it.
11. Help Button
Opens the help documentation in the Astute Manager. If this does not automatically appear, please ensure your Astute Manager is running first.
