
 Path Zipper Tool
Path Zipper is an Astute Graphics tool for Adobe Illustrator that “zips” sections of paths together, i.e., ensures that their edges are exactly coincident, without gaps or overlaps. Additionally, the tool can split paths at existing anchor points and delete segments from paths, in order to assist in creating centerlines in certain situations. Path Zipper is part of the VectorScribe plugin.
Tool Location and Cursor Appearance
The Path Zipper tool appears in Illustrator’s main toolbar (which must be in Advanced mode: View > Toolbars > Advanced) stacked under the PathScribe tool along with several of VectorScribe’s other tools. As with other stacked tools, click and hold on the top tool icon to display the tools stacked under it.
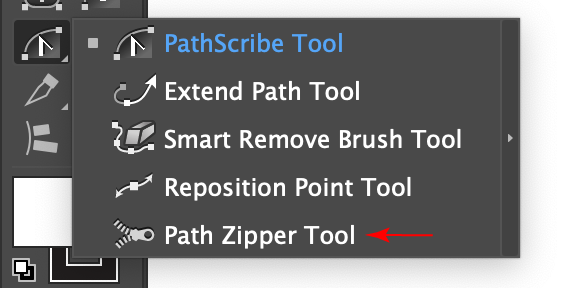
Path Zipper Tool Location
The Path Zipper tool’s cursor is a dot surrounded by a circular annotation indicating the active area of the tool. When using one of its two special modes, the dot will change to scissors or an “×”.

Path Zipper Tool Cursors
Path Zipper Tool Operation
As the Path Zipper tool has several keypresses which can add or change its functionality, we suggest installing the free Astute Graphics plugin Astute Buddy, which creates a panel that dynamically updates to inform you of the various keys which can be pressed in the tool’s current context.
When a path contains two anchor points that are each coincident (at the same coordinates) with two points on a second path, then the section between those points may be zipped with the Path Zipper tool by placing the tool over both edges of the potential zipper and clicking. The paths do not need to be selected, but must be unlocked.
The tool previews a potential zipper using blue and red lines. The blue lines (which are dashed) indicate the original edges of the zipper, and the solid red line shows the position that the zipped paths will assume after clicking. A section of path that is already zipped will be indicated with a green line.
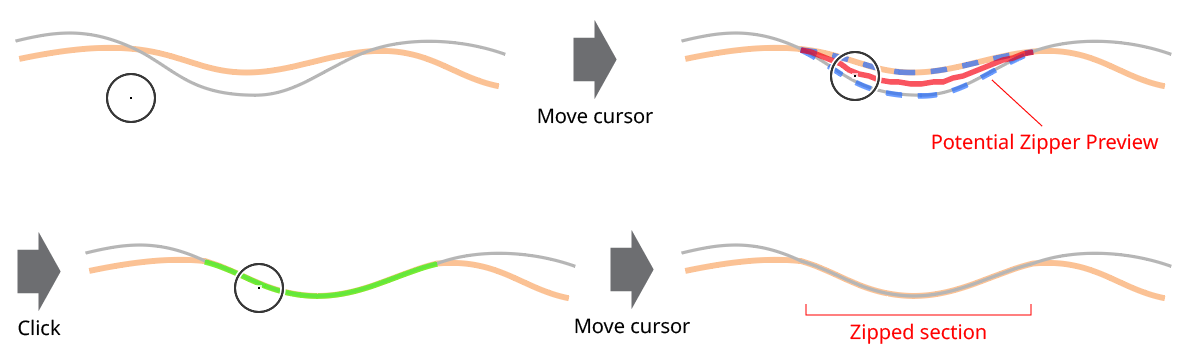
Path Zipper Tool Basic Operation
By default, the new zipper is created by averaging the positions of the original edges along the length of the zipper. To make the zipper lie along one or the other of the paths’ original edges, hold down Shift or Option/Alt:
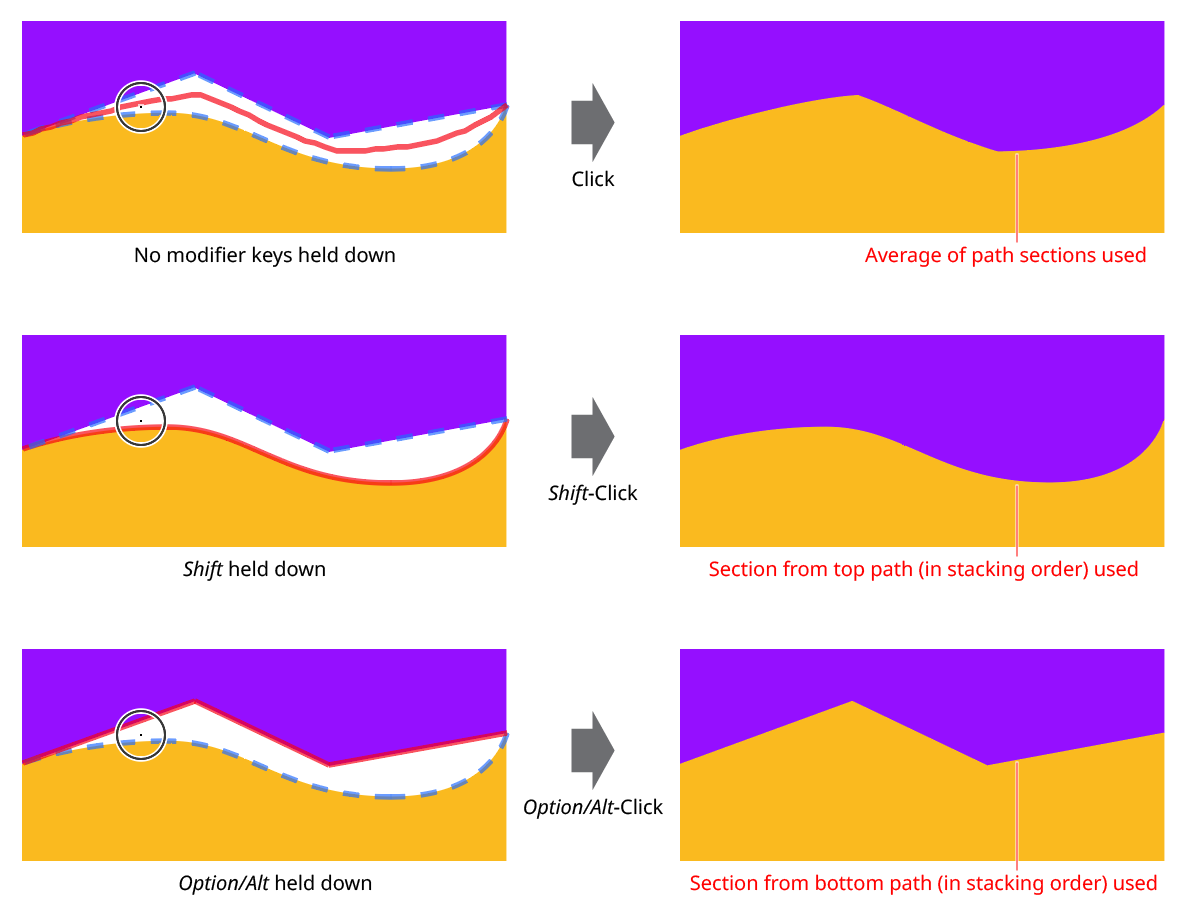
Path Zipper Tool Modifier Keys
Shift causes the zipper to run along the path which is on top in the stacking order, and vice versa.
Creating Zipper Ends
Because paths which you might want to zip together do not always conveniently contain coincident points at each end of the zipper, Path Zipper provides additional functions for creating such points.
First, if the paths have anchor points that are close to each other but not coincident, Path Zipper can make them coincident. When the points are within the cursor circle, they will be highlighted with semi-transparent blue dots. The new, common position of the points is shown with a red dot. After clicking, the points will be shown with a green dot, which indicates that they have been made coincident.
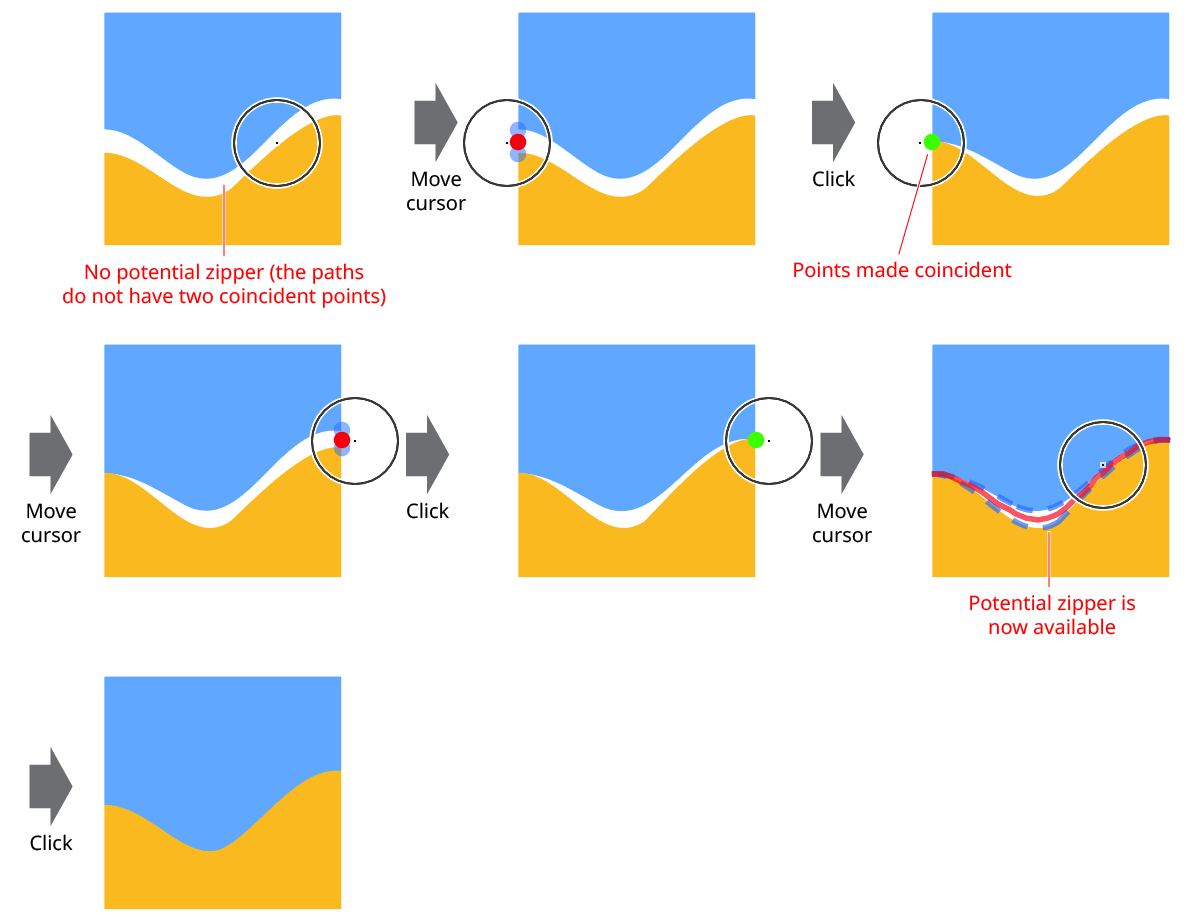
Path Zipper Making Points Coincident
As with the zipping operation, a click without modifier keys simply averages the positions of the points together, while holding down Shift or Option/Alt moves the new position to one or the other of the points. If more than two points are being made coincident, another method of specifying the new point position is available: with the mouse button held down, press the A key to cycle through the different points.
Second, if only one of the paths has an existing anchor point at the desired zipper end position, then, as long as that point and at least part of the other path are within the cursor circle, a new point can be simultaneously created on the other path and made coincident. In this case, the existing point is indicated with a solid purple dot, the (virtual) new point on the other path by a hollow purple dot, and the new, common position of the points with a red dot.
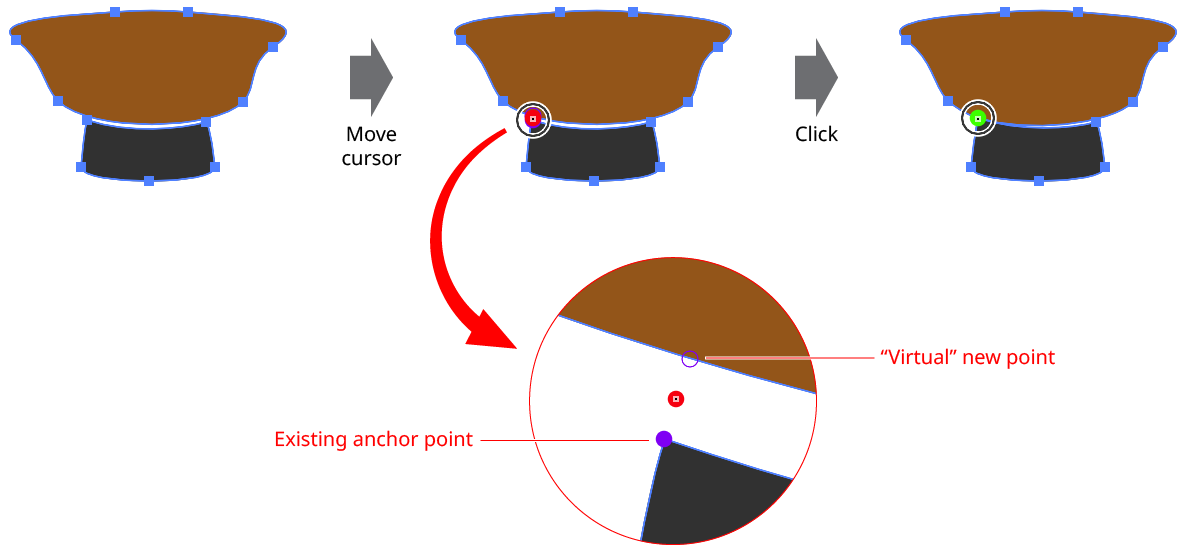
Path Zipper Adding and Making Points Coincident
Again, as with the zipping operation, a click without modifier keys simply averages the positions of the points together, while holding down Shift or Option/Alt moves the new position to one or the other of the points.
Finally, the paths may intersect each other at one end of a desired zipper segment, but without an anchor point there on either path. In this case, with only the spot of intersection inside the cursor circle (indicated by a solid magenta dot), clicking will create a coincident point on each path at that spot.
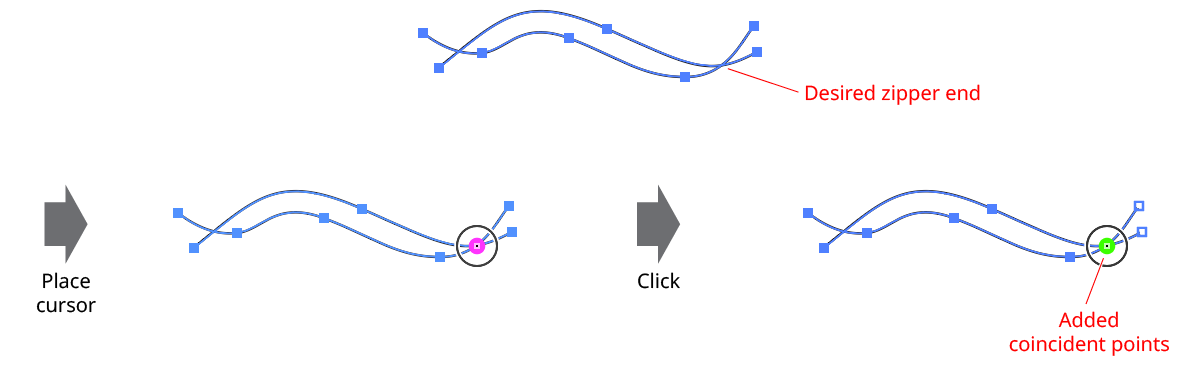
Path Zipper Adding Intersection Points
There may be occasions when the points you want to make coincident (or add and make coincident, or add at an intersection) are within a potential zipper, which takes precedence. In this situation, to override zipper mode and allow for these additional functions, hold down Shift+Option/Alt. Note that with these modifier keys down, the new coincident point position will always be at the averaged position of the points. If this would result in undesired geometry, then the point(s) can always be added and/or moved manually using a different tool, such as the PathScribe tool.
Convenience Functions
It is sometimes necessary to split a path at one of its anchor points, or remove one or more segments from a path. Although these operations can obviously be done using other existing tools, Path Zipper provides “one-click” convenience functions with which to do them, avoiding the need to change tools.
First, if a single anchor point is within the cursor circle, Option/Alt-clicking will split the path at that point (creating two paths, if the path was open). Second, if one (or more than one, as long as they are contiguous) segments of a single path are within the cursor circle, Option/Alt-clicking will remove those segments from the path (also creating two paths, if the path was open).
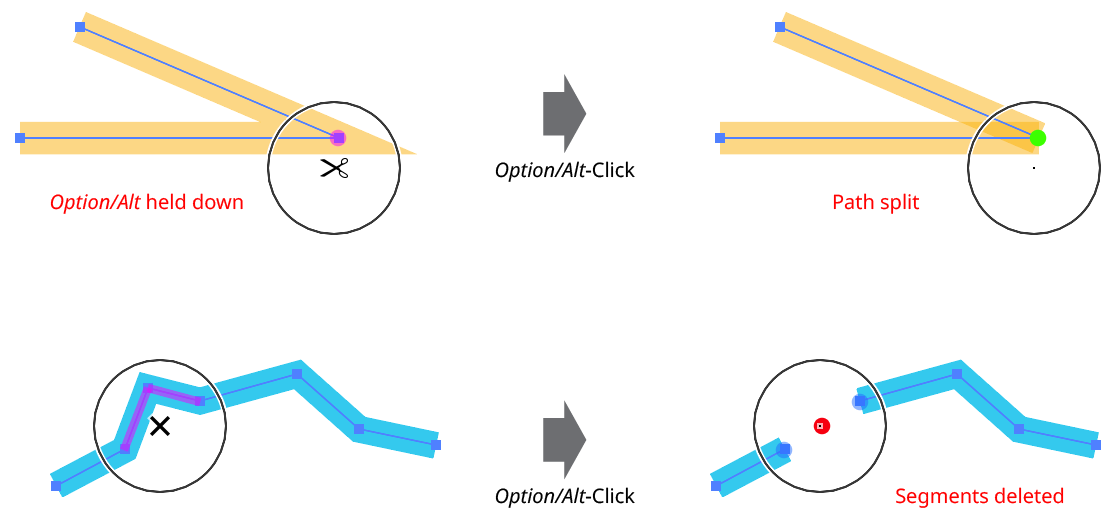
Path Zipper Splitting and Deleting Segments
In both cases, the Path Zipper cursor changes to indicate the function (showing scissors for split path and an “×” for delete segment), and the affected anchor point or segment(s) are highlighted in semi-transparent magenta.
These convenience functions can speed up the process of creating centerlines from outlined paths:
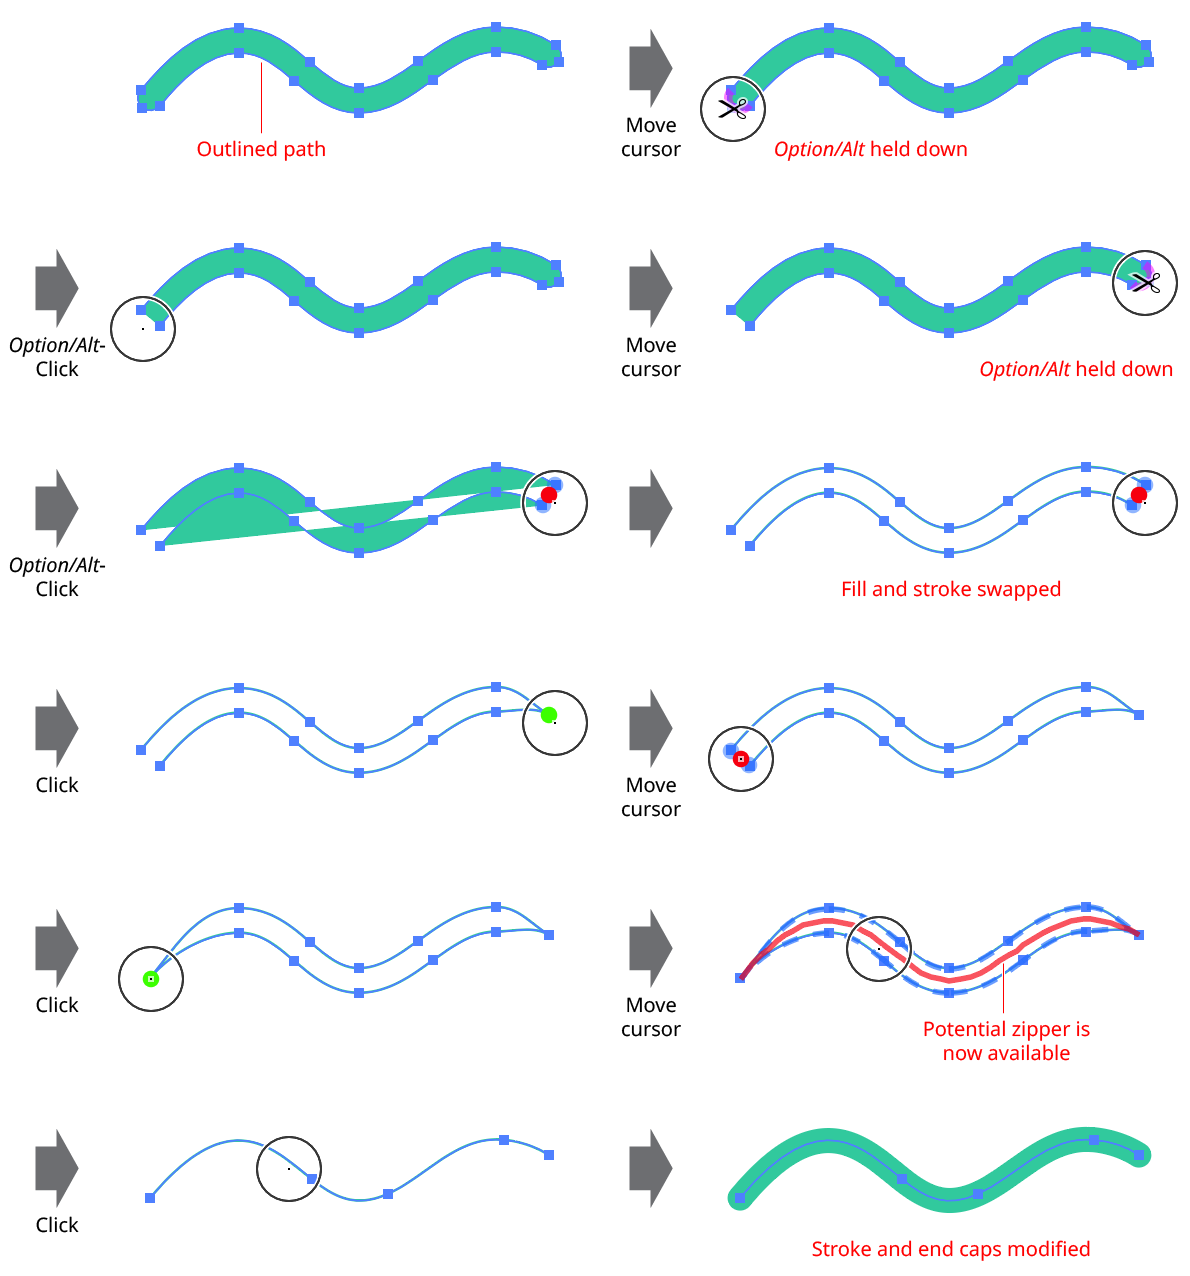
Path Zipper Creating Centerline
After zipping together the two paths to create the centerline, Path Zipper, by default, automatically removes one of the two paths, since they are now duplicates. This behavior can be specified in the Path Zipper Preferences dialog (see below).
Path Zipper Preferences
Double-clicking the Path Zipper tool in the toolbox, or pressing the Enter key when the tool is selected, will bring up the Path Zipper preferences dialog:
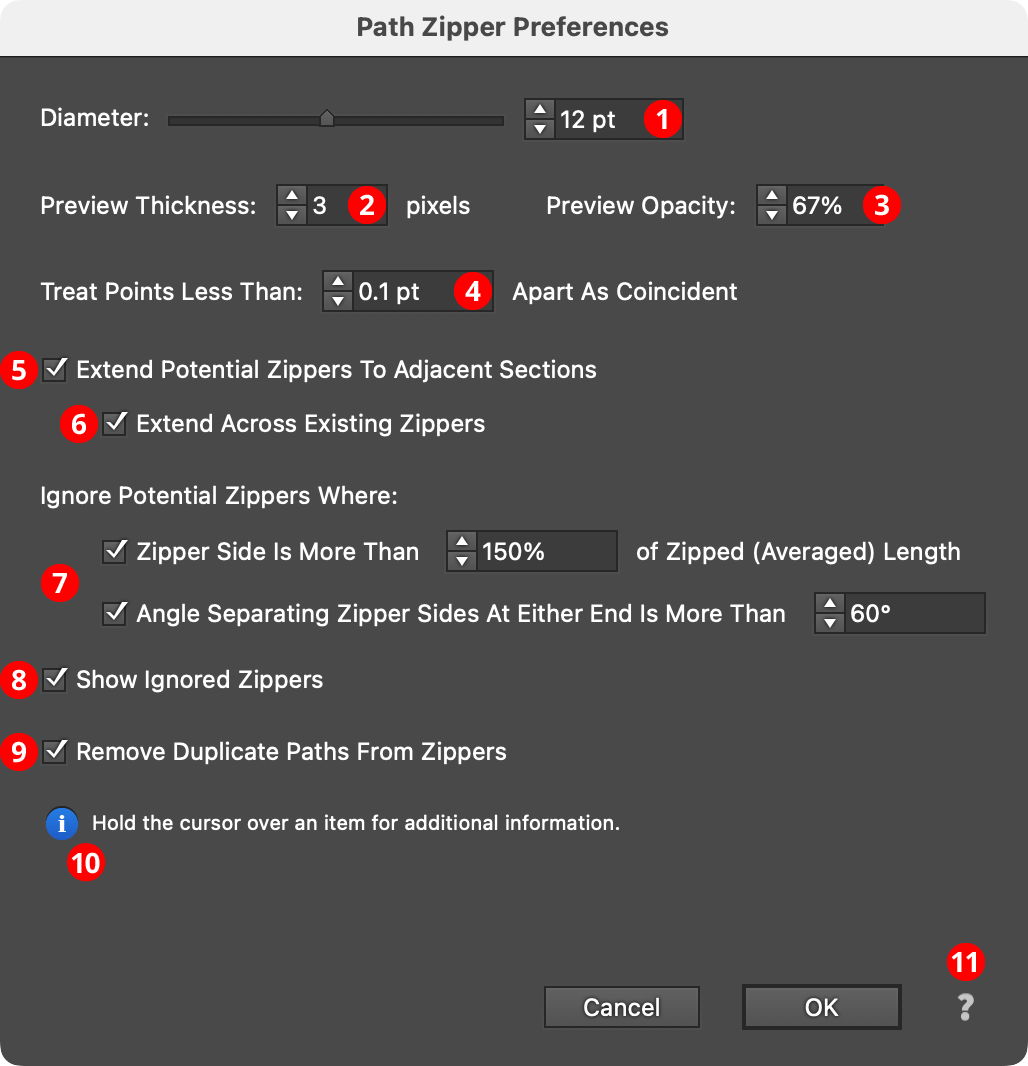
Path Zipper Preferences
1. Diameter
The diameter of the active area of the Path Zipper tool, from 0.25 pt to 200 pt. The value may also be changed using the keys assigned to Decrease Diameter and Increase Diameter in the native Keyboard Shortcuts dialog (the left and right square brackets keys, respectively, by default, for English language keyboards).
2. Preview Thickness
The thickness of the annotations that indicate potential and existing zippers, from 1 px to 12 px. The default thickness is 4 px.
3. Preview Opacity
The opacity of the annotations that indicate potential and existing zippers, from 25% to 100%. The default opacity is 67%.
4. Treat Points Less Than ___ Apart As Coincident
Allows points which are not truly coincident, but are actually separated by a small distance, to act as coincident for the purposes of allowing zippers to be created. The default tolerance is 0.002 pt, but can range from 0 pt to 3 pt.
5. Extend Potential Zippers To Adjacent Sections
When enabled (the default), and a potential zipper (section of two paths that have coincident points at both ends) is adjacent to one or more other potential zippers, then placing the tool above any section will display all the sections together as a single potential zipper. This saves having to click on each section individually to zip a long section of path which already shares many anchor points. However, when using the averaging method of zipper creation, interior coincident points in the merged zipper will generally not be retained in their original positions, and points may be added or removed. To toggle the preference on the fly when using the Path Zipper tool, while holding the mouse button down, press the E key.
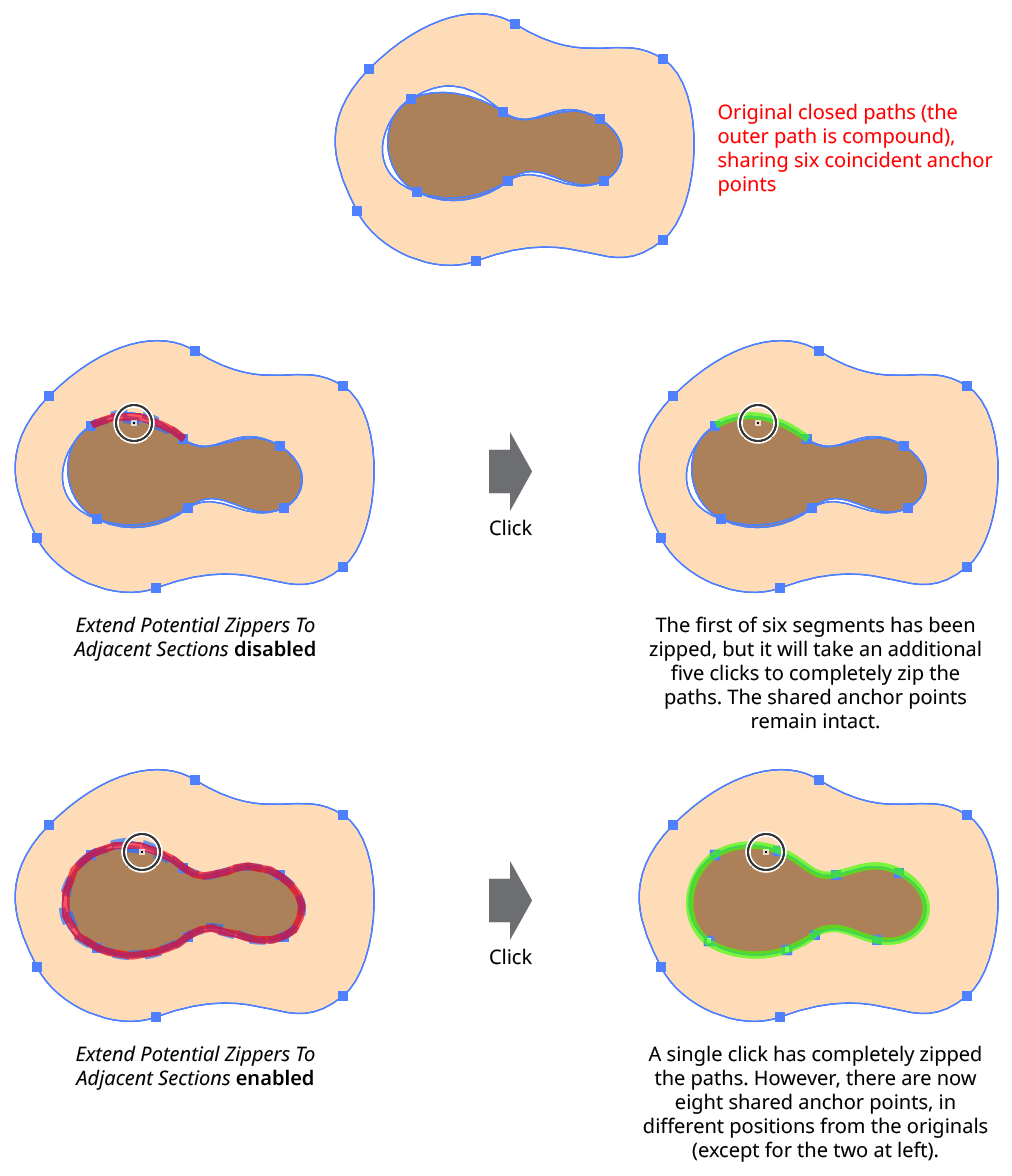
Path Zipper Potential Zipper Extension
6. Extend Across Existing Zippers
Available when Extend Potential Zippers To Adjacent Sections is enabled. When Extend Across Existing Zippers is enabled (the default), a consolidated potential zipper may span sections of path that are already zipped.
7. Ignore Potential Zippers Where...
When zipping a closed path, there are two ways a zipper could be created between its two coincident points: one running along the path direction, and one against it. Because both edges of a potential zipper must lie under the cursor, specifying which of these zippers is the desired one is usually not an issue. However, there are instances in which “wrong way round” potential zippers will be previewed and even block the creation of a zipper endpoint (necessitating the use of the Shift+Option/Alt override). In the following example, the two paths already contain a zipped section; placing the cursor over the unzipped section at lower right will instead preview the potential zipper that connects the coincident points over the top of the closed purple path and along the bottom of the closed yellow path:
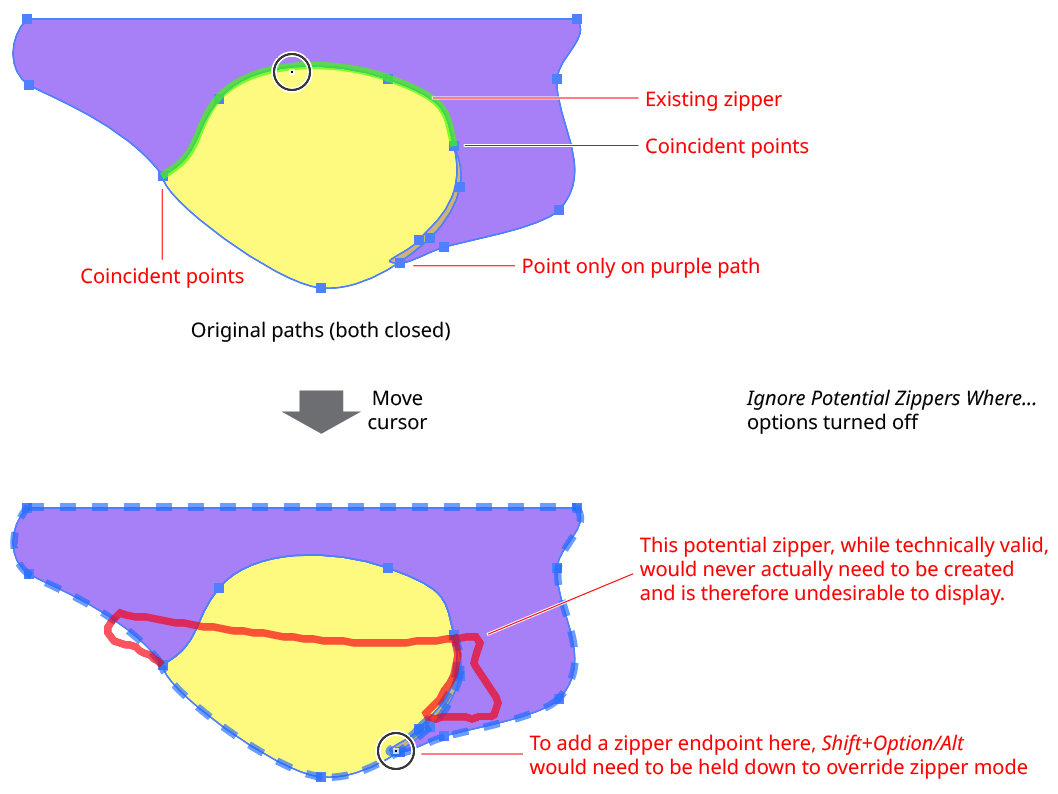
Path Zipper Undesirable Zipper
To help “weed out” potential zippers which are clearly undesirable, two independent tests are, by default, enabled. The first relies on the fact that paths that make sense to be zipped typically already run fairly close together. It therefore checks the sides of the zipper (before it is zipped) against the path section that would be created using the averaging method. If the length of either of these sides compared to the zipped section exceeds the specified tolerance ratio, then the zipper will be ignored. The default tolerance ratio, which can vary between 100.1% and 400%, is 110%.
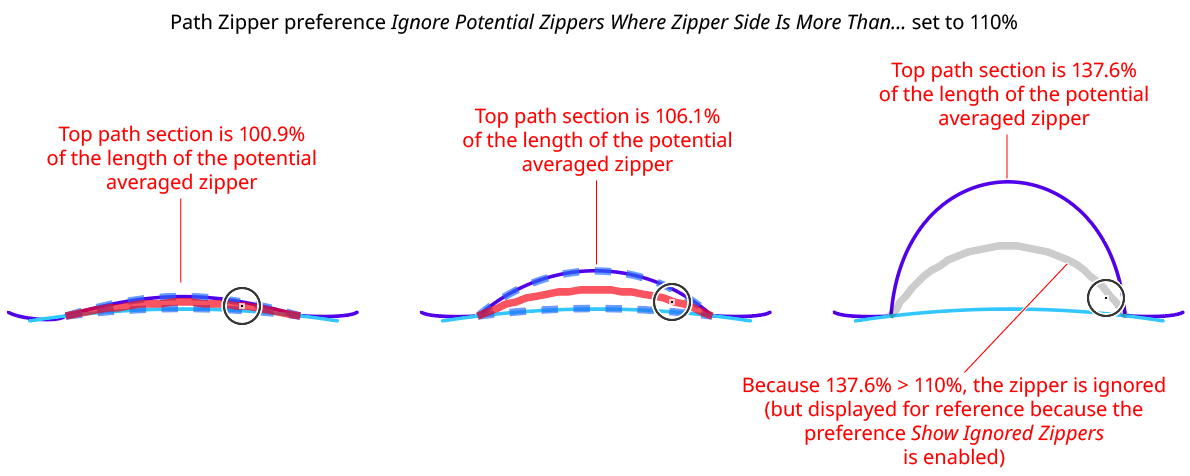
Path Zipper Ignoring Zipper Based on Length
The second test checks the angle between the two zipper sides as they leave the coincident points which form each zipper’s endpoint. If the angle at either end exceeds the specified value, then the zipper will be ignored. The default tolerance angle, which can vary between 0.1° and 180°, is 120°.
8. Show Ignored Zippers
When enabled, potential zippers that are ignored will still be displayed, but in a less prominent manner: the zipper sides are not annotated, and the zipper itself is drawn in light gray. When Show Ignored Zippers is enabled, the zipper can still be forced to be created by holding the mouse button down and pressing the F key. This temporarily removes the Ignore constraints. If the mouse button is then released, the zipper is created as normal.
9. Remove Duplicate Paths From Zippers
This option is mainly for use when recreating the centerline of an outlined path. When enabled, and two entire paths with the same style are zipped together (creating one duplicate path atop the other), one of the duplicates will automatically be removed. A transient notification will appear at the top of the screen.
10. Informational area
Shows a brief description of each preference control when the cursor is being hovered over it.
11. Help Button
Opens the help documentation in the Astute Manager. If this does not automatically appear, please ensure your Astute Manager is running first.


